Twilio
Written By Maruf Ansari
Last updated About 2 months ago
If you already have a phone number in your own Twilio account and want to keep using it, you can connect it to your Kickcall agent directly. This uses SIP Connectivity (SIP Trunking), and falls under Kickcall's Bring Your Own Carrier (BYOC) option.
Setup involves two short sessions — one in Kickcall, one in your Twilio console — that you'll switch between. Altogether it takes about 15–30 minutes.
How this compares to a Kickcall number
If you don't already have a Twilio account, or just want the fastest path to a working line, Kickcall can also provision a dedicated number for you instantly — covered in the Native Carrier — Twilio guide. Here's how the two compare:
Why choose this path. Choose this if your customers already call a specific number and you don't want that to change, or if you want to keep managing your own carrier relationship.
Before you start
An existing Twilio account — with the phone number you want to connect already active on it.
Console access — in your Twilio account, matching the account holder or an admin.
Access to your Kickcall Business Portal.
How it works
A phone connection has two independent directions, and you'll configure both:
Inbound (Origination) — calls arriving at your Twilio number need to reach your agent. You'll point Twilio at the SIP address Kickcall generates for you.
Outbound (Termination) — calls your agent places need to go out through your Twilio trunk to reach real phone numbers. You'll point Kickcall at the address Twilio gives you.
Step 1 — Start your setup in Kickcall
In Kickcall, go to Configure → Connect Phone.
Select Bring Your Own Carrier (BYOC).

Choose SIP Connectivity as your telephony provider, then select the SIP Trunking tab.
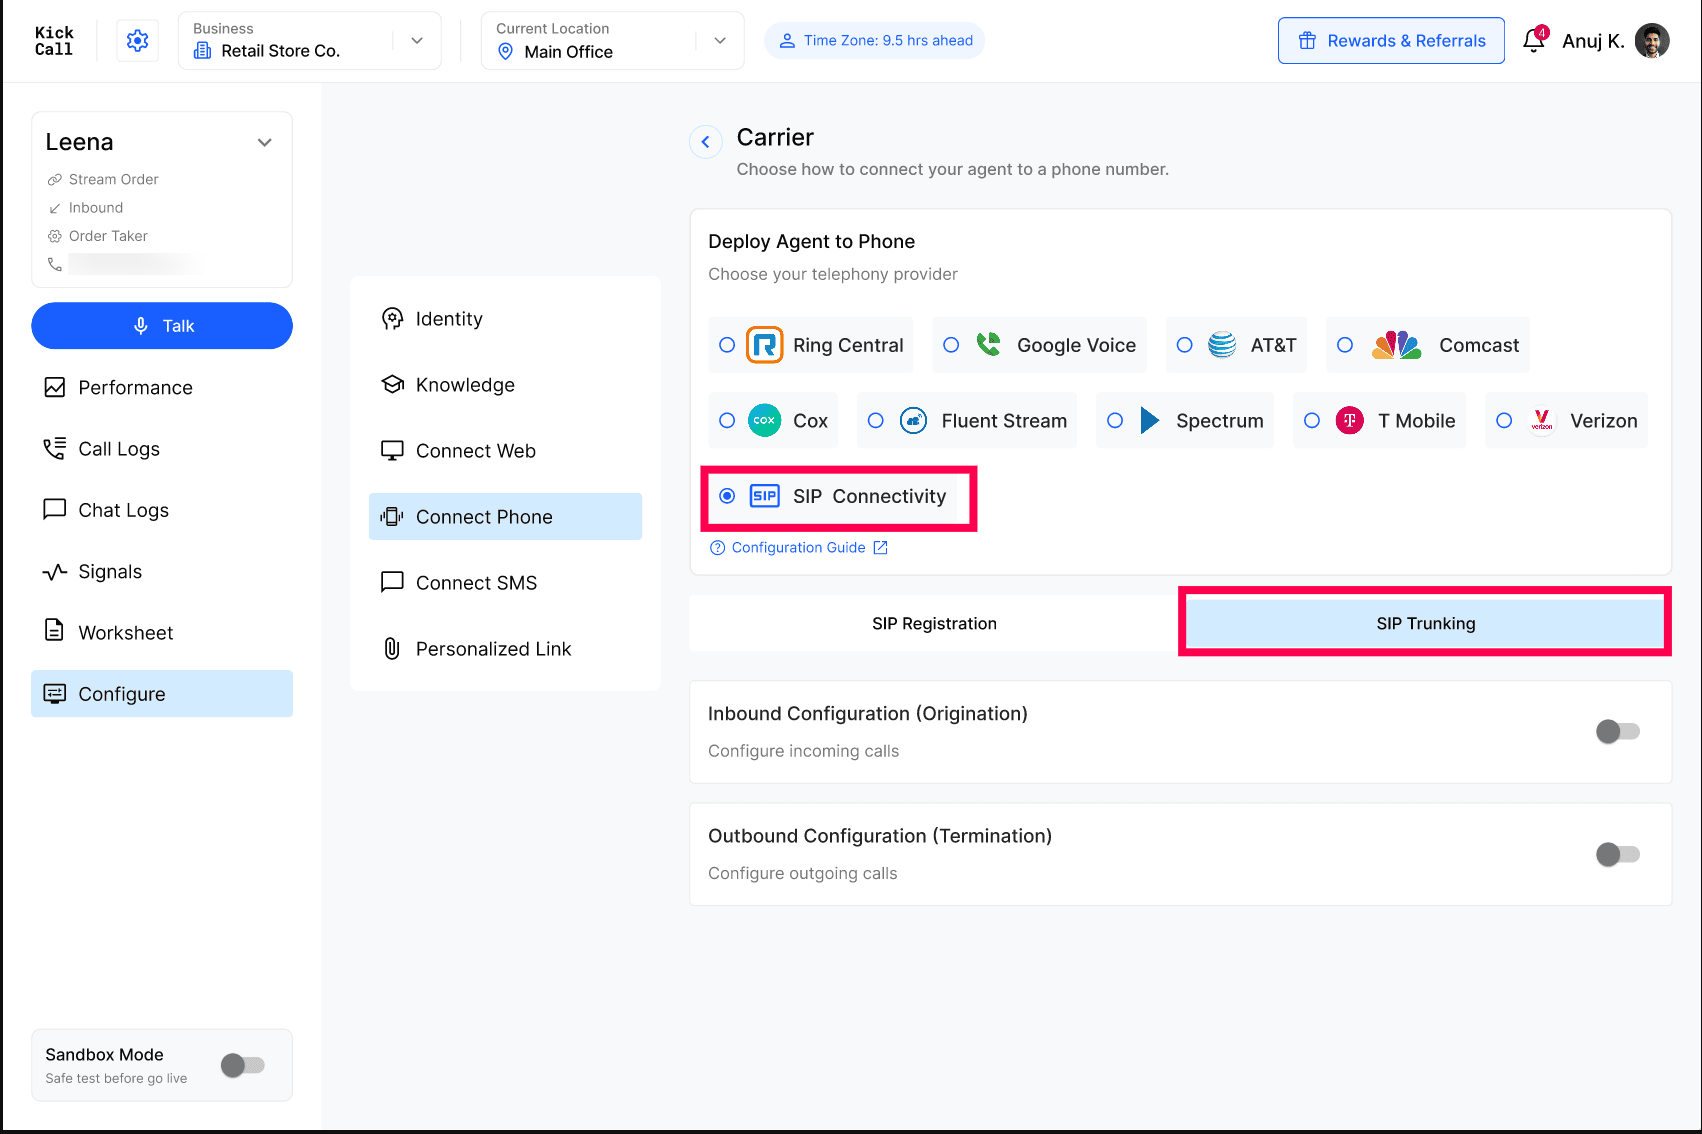
Turn on Inbound Configuration (Origination). This generates a unique SIP address for your account — copy it; you'll need it in Step 3.

Step 2 — Create an Elastic SIP Trunk in Twilio
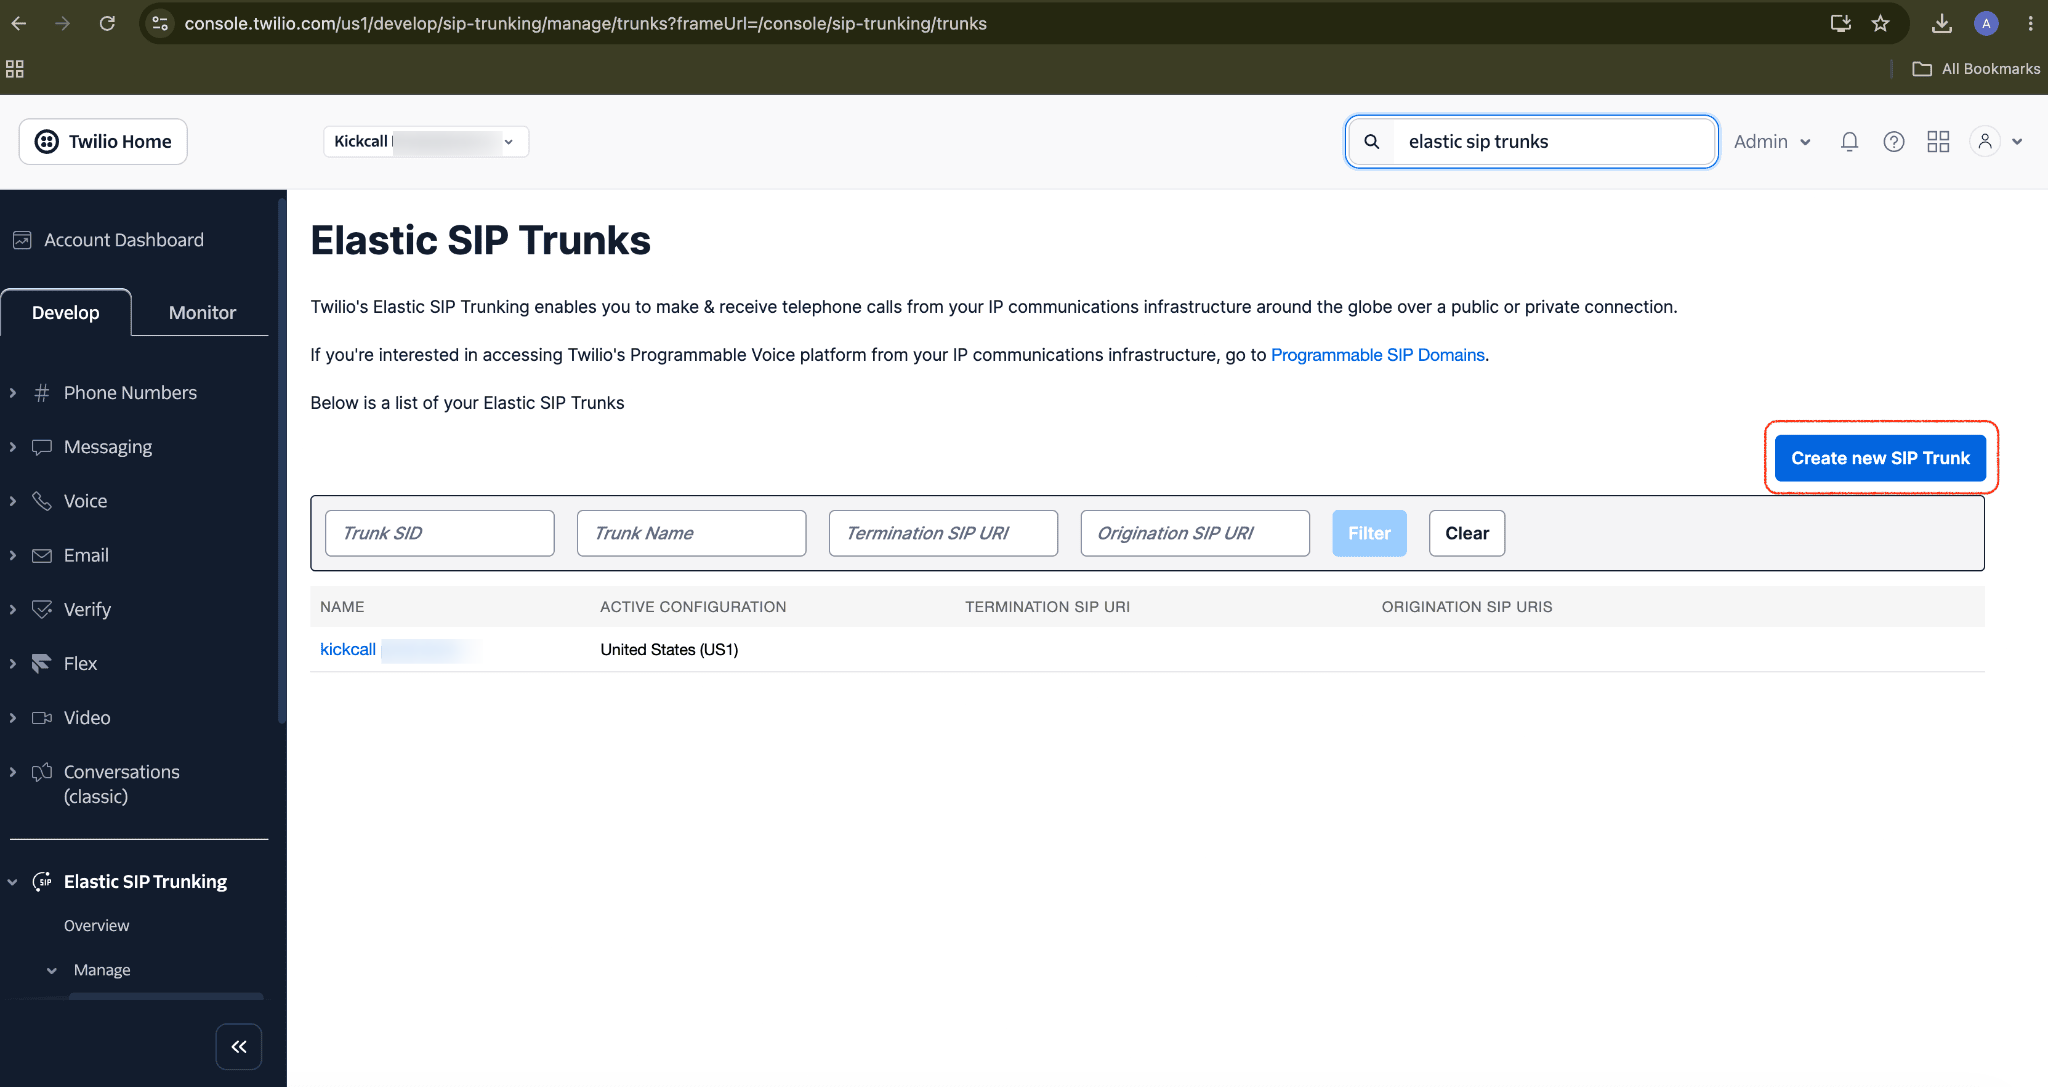
In your Twilio Console, search for Elastic SIP Trunks.
Click Create new SIP Trunk, and give it a recognizable name (for example, your business name).
Step 3 — Point Twilio's origination at Kickcall
Open your new trunk and go to Origination.
Click the + button to add an Origination URI, and paste the SIP address you copied from Kickcall in Step 1.
Leave Priority and Weight at their defaults, and make sure Enabled is checked.
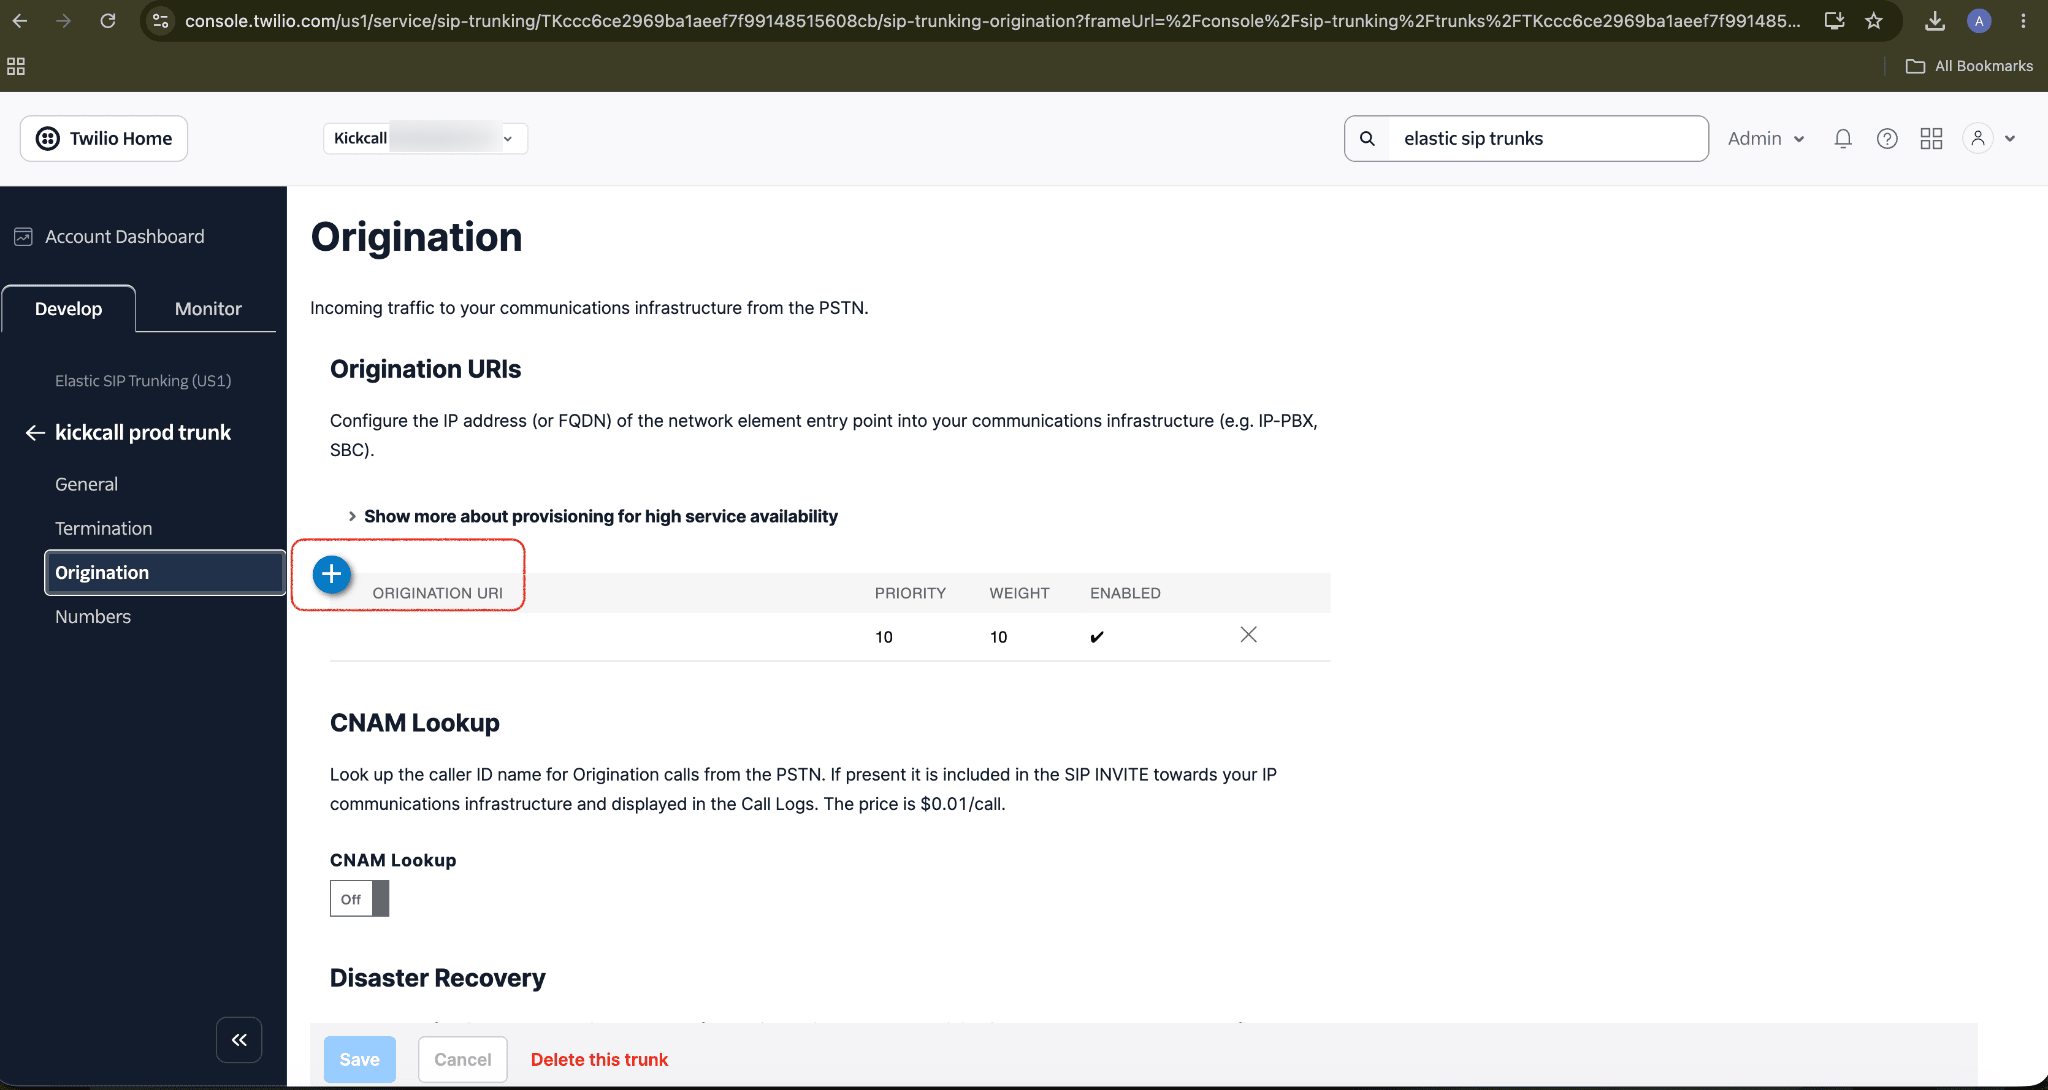
What this does. This tells Twilio where to send calls the moment they arrive at your number — directly to your Kickcall agent.
Step 4 — Set up termination (outbound calling)
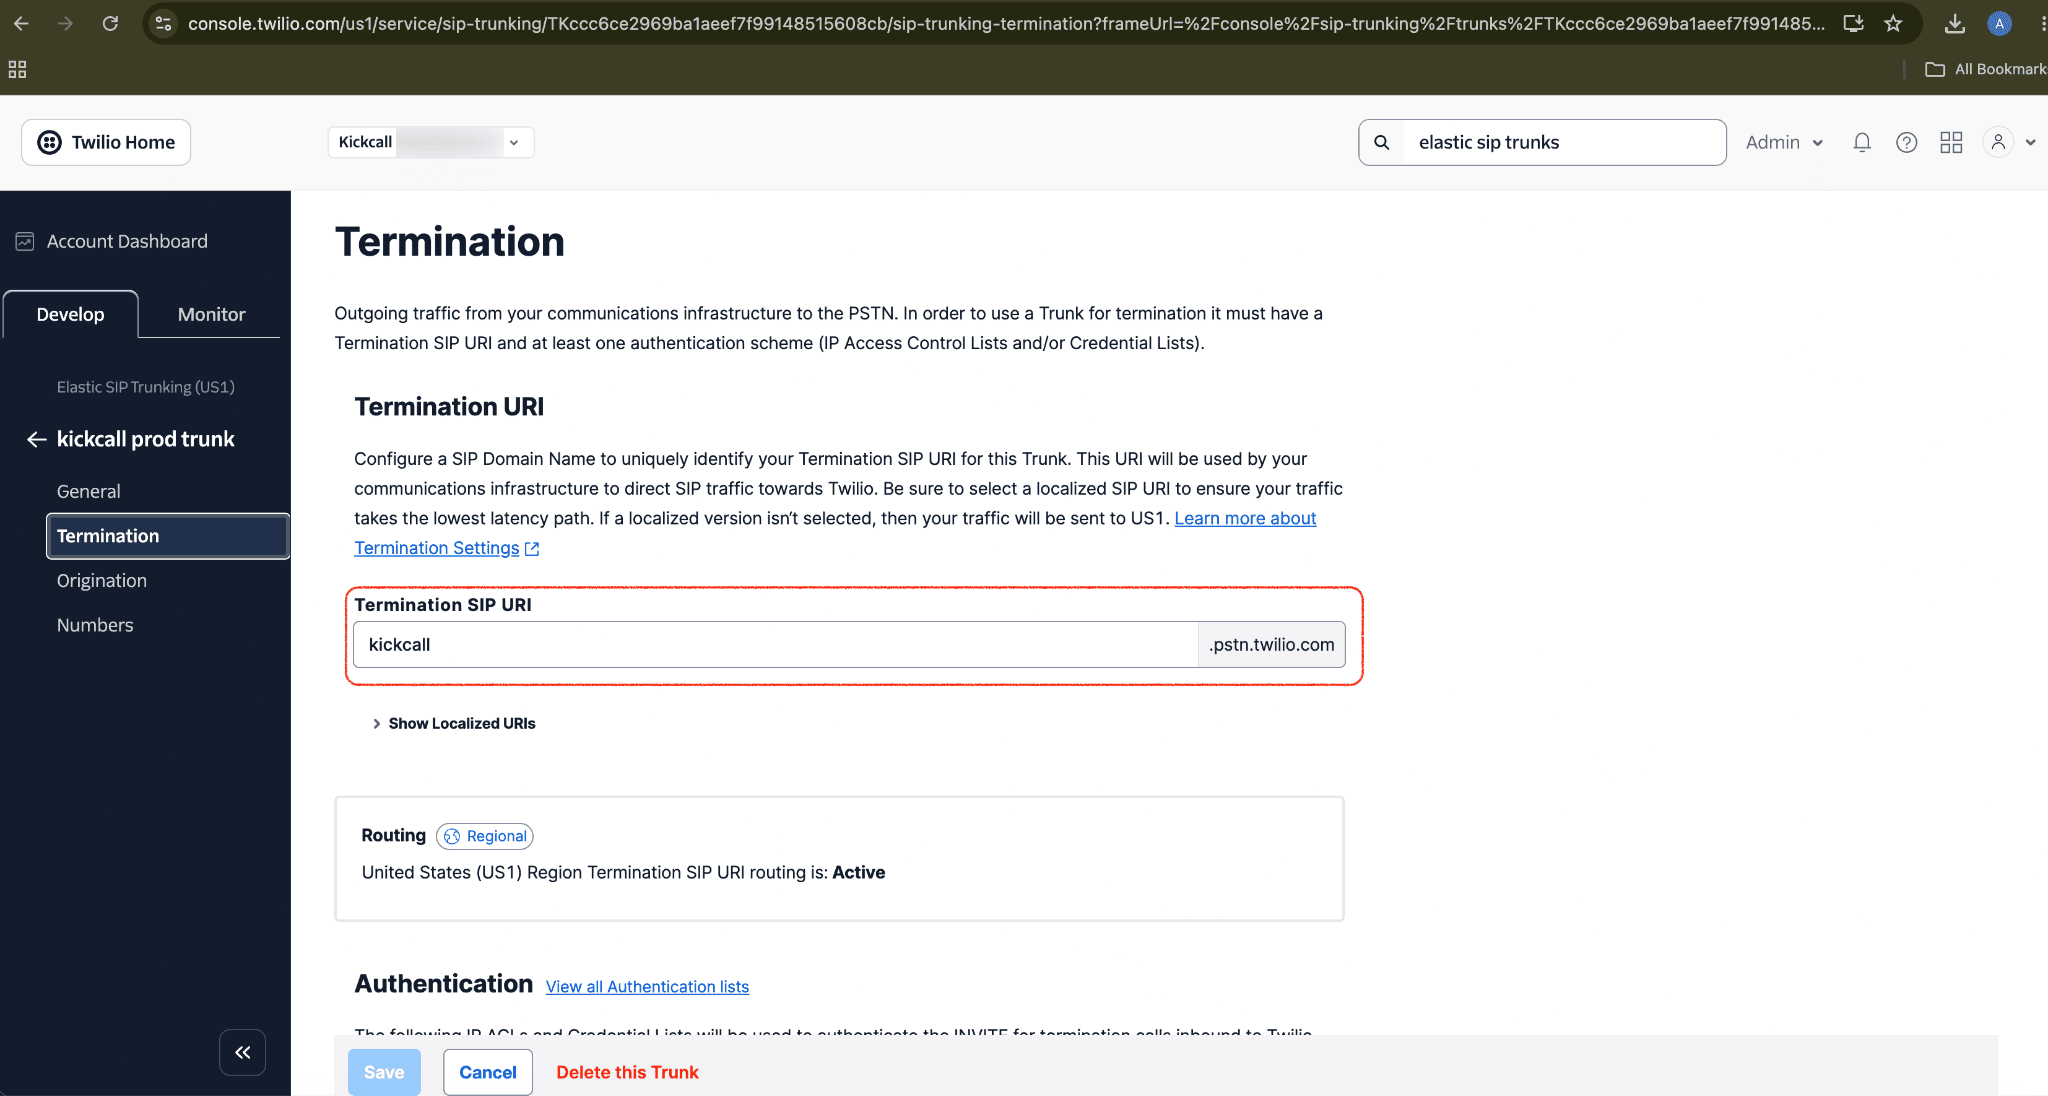
In the same trunk, go to Termination.
Configure a Termination SIP URI. Twilio suggests one based on your trunk name (for example,
yourtrunkname.pstn.twilio.com). Save this — you'll enter it into Kickcall in Step 6.Under Authentication, add at least one of: an IP Access Control List, or a Credential List. Twilio requires one of these before the trunk can carry outbound traffic.
Whitelist Kickcall's outbound addresses. If you use an IP Access Control List, add Kickcall's outbound SIP signaling ranges so Twilio accepts calls placed by your agent. Please refer to the IP Whitelist document for the current list of ranges to add — outbound calls may fail to connect until all listed ranges are whitelisted on your side. If you'd rather not manage an IP list, a Credential List works just as well — just note the username and password, as you'll enter the same ones into Kickcall in Step 6.
Step 5 — Assign the trunk to your number
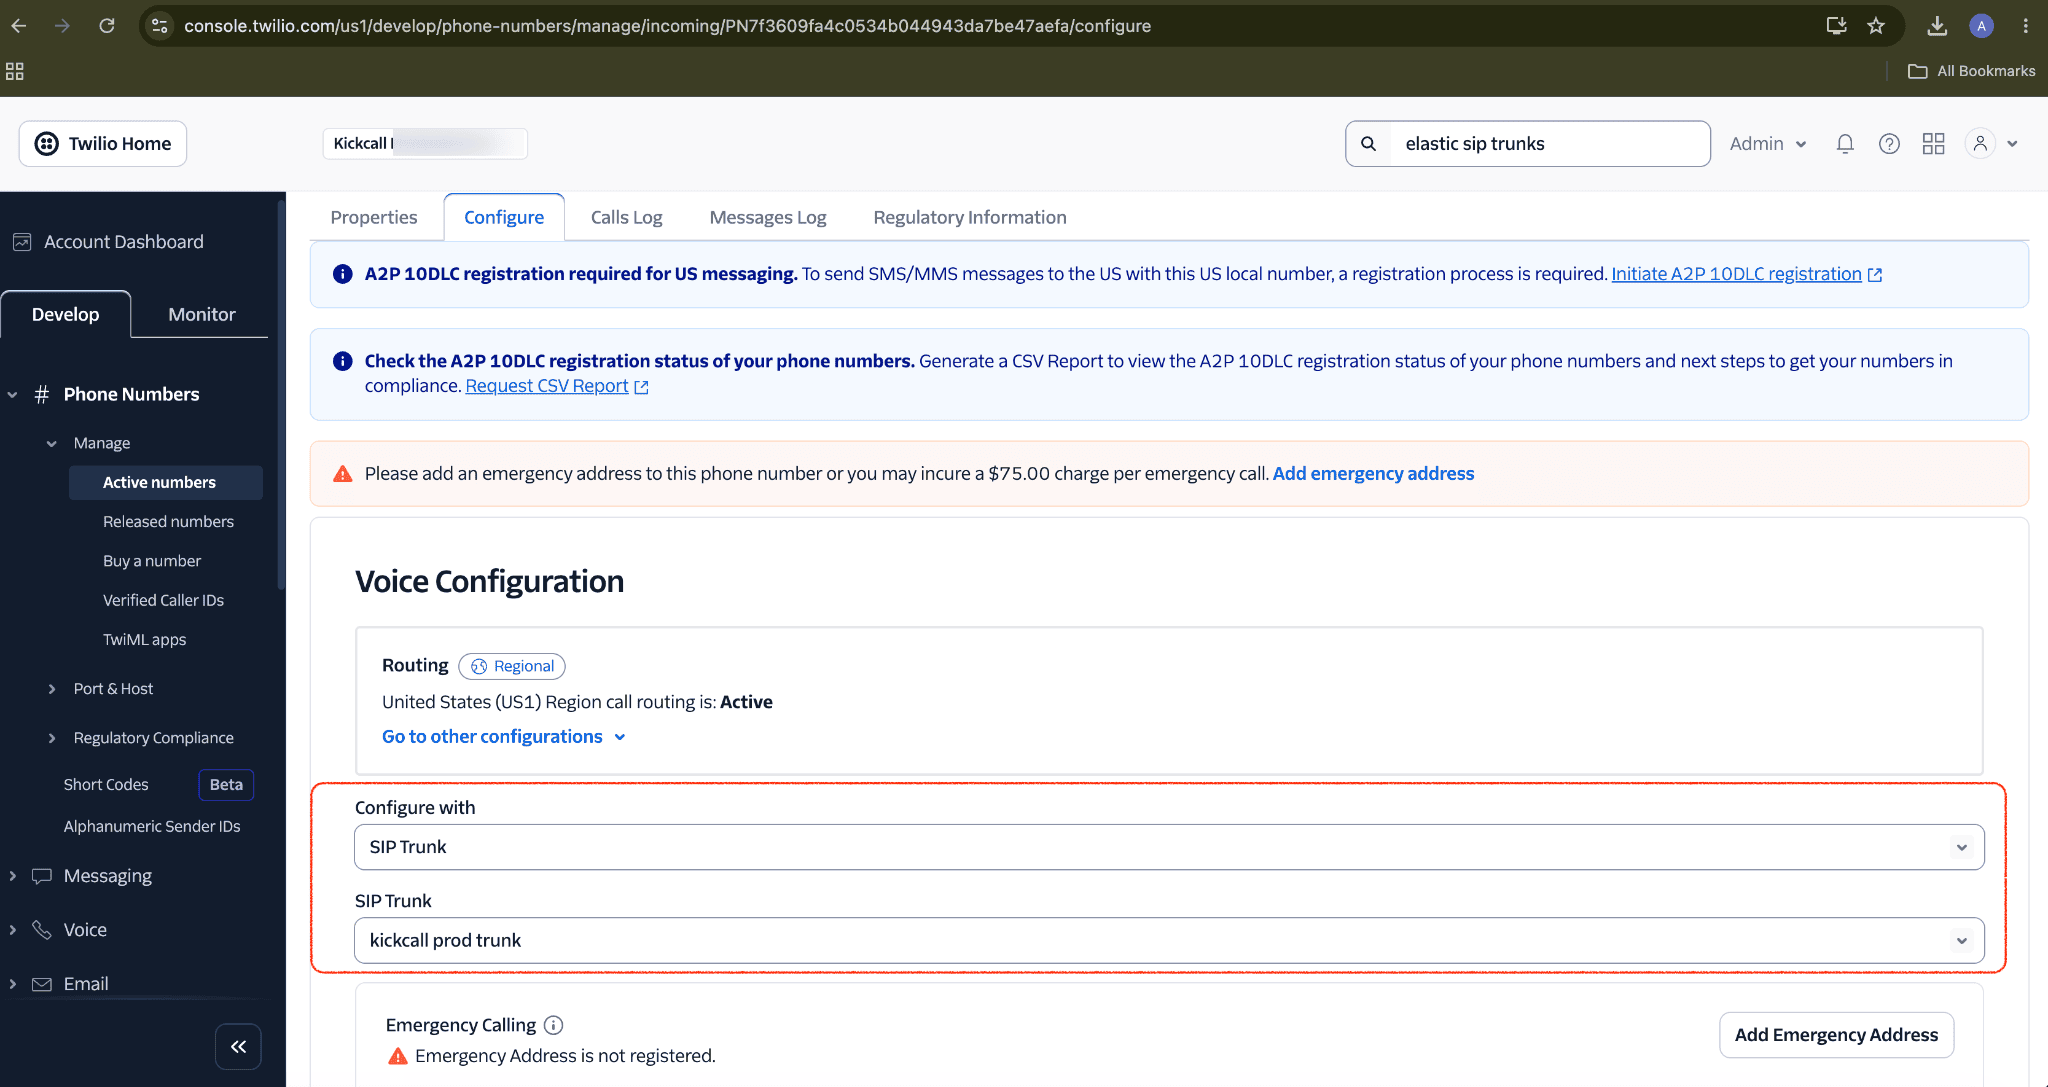
In Twilio, go to Phone Numbers → Manage → Active Numbers, and open the number you want to connect.
Go to the Configure tab.
Under Configure With, select SIP Trunk.
Choose the trunk you created in Step 2 from the dropdown, then save.
Step 6 — Finish your setup in Kickcall
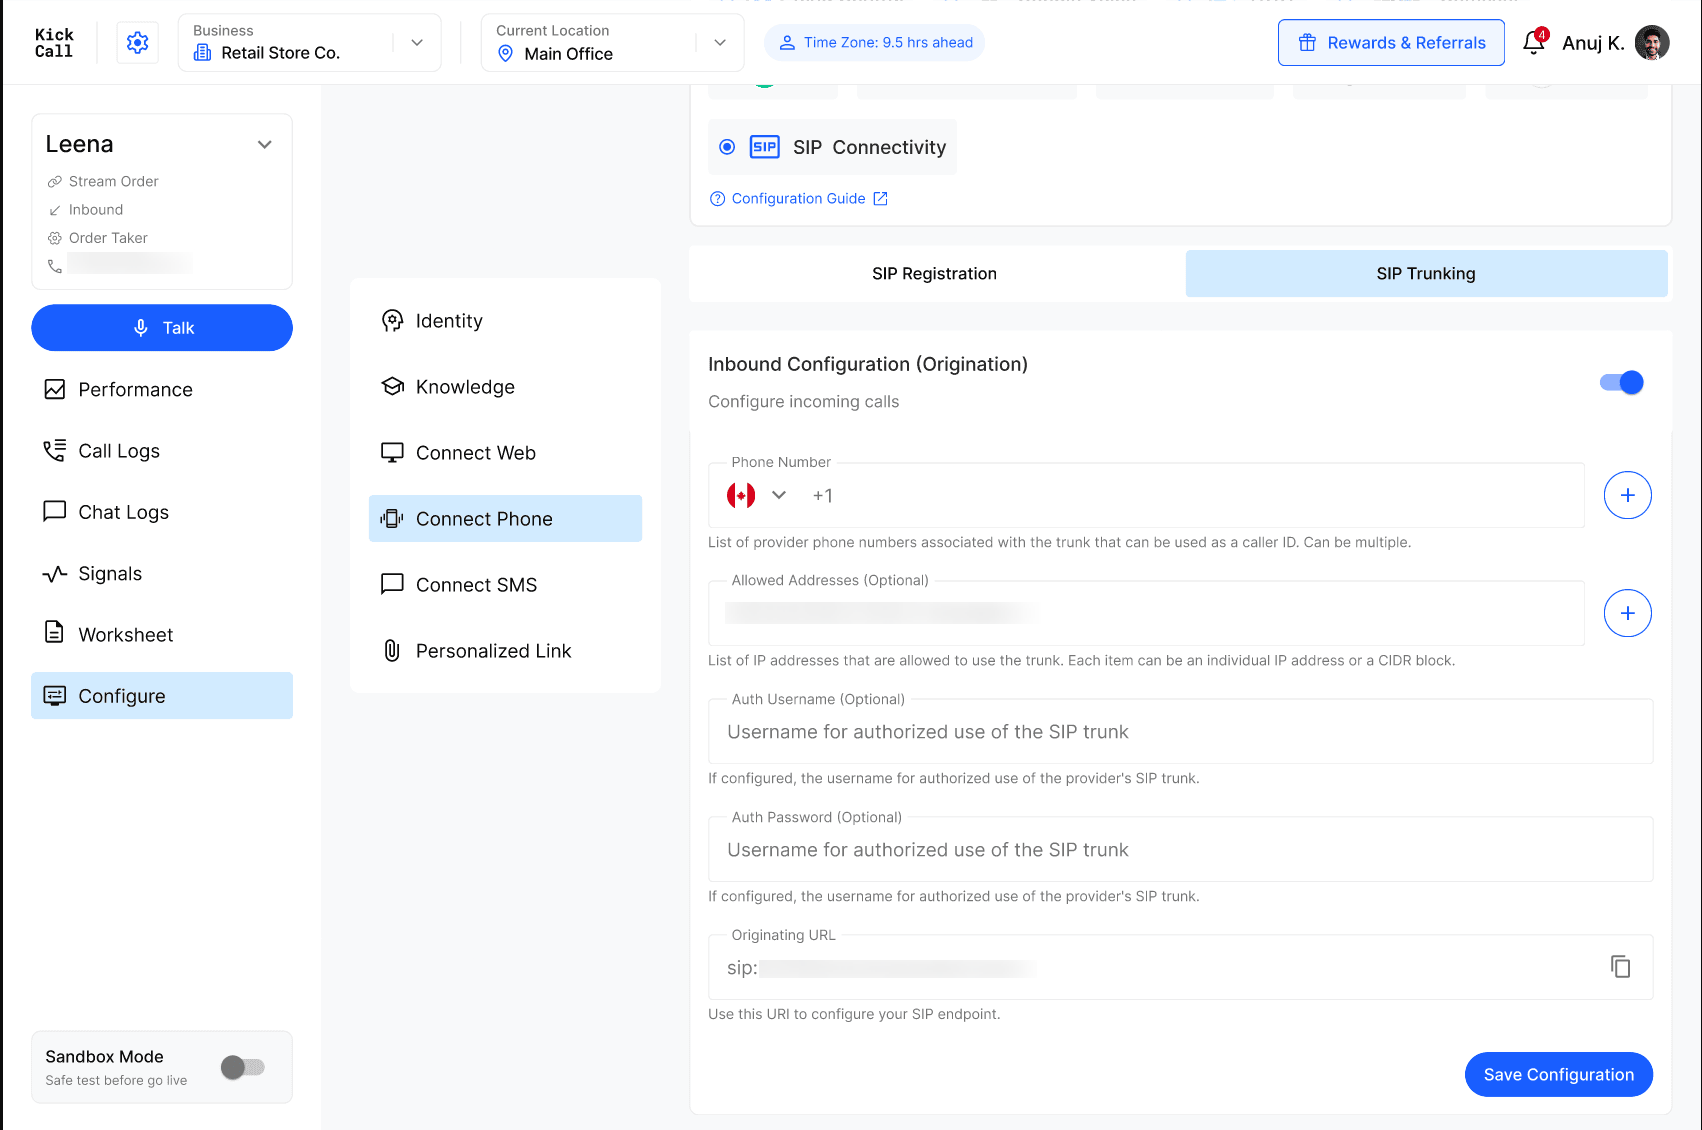
Back in Kickcall, return to Configure → Connect Phone → Bring Your Own Carrier → SIP Connectivity → SIP Trunking.
Under Inbound Configuration (Origination), set Phone Number to your Twilio number.
Turn on Outbound Configuration (Termination).
Set Hostname or IP to the Termination SIP URI from Step 4 (no
sip:prefix).Set Designation Country to match your number's country.
If you used a Credential List in Step 4, enter the same Username and Password here. If you used an IP Access Control List instead, leave these blank.
Save your configuration.

Step 7 — Test your connection
Call your Twilio number from an outside phone to confirm it reaches your agent.
Have your agent place an outbound call to confirm it goes through.
Optional trunk settings
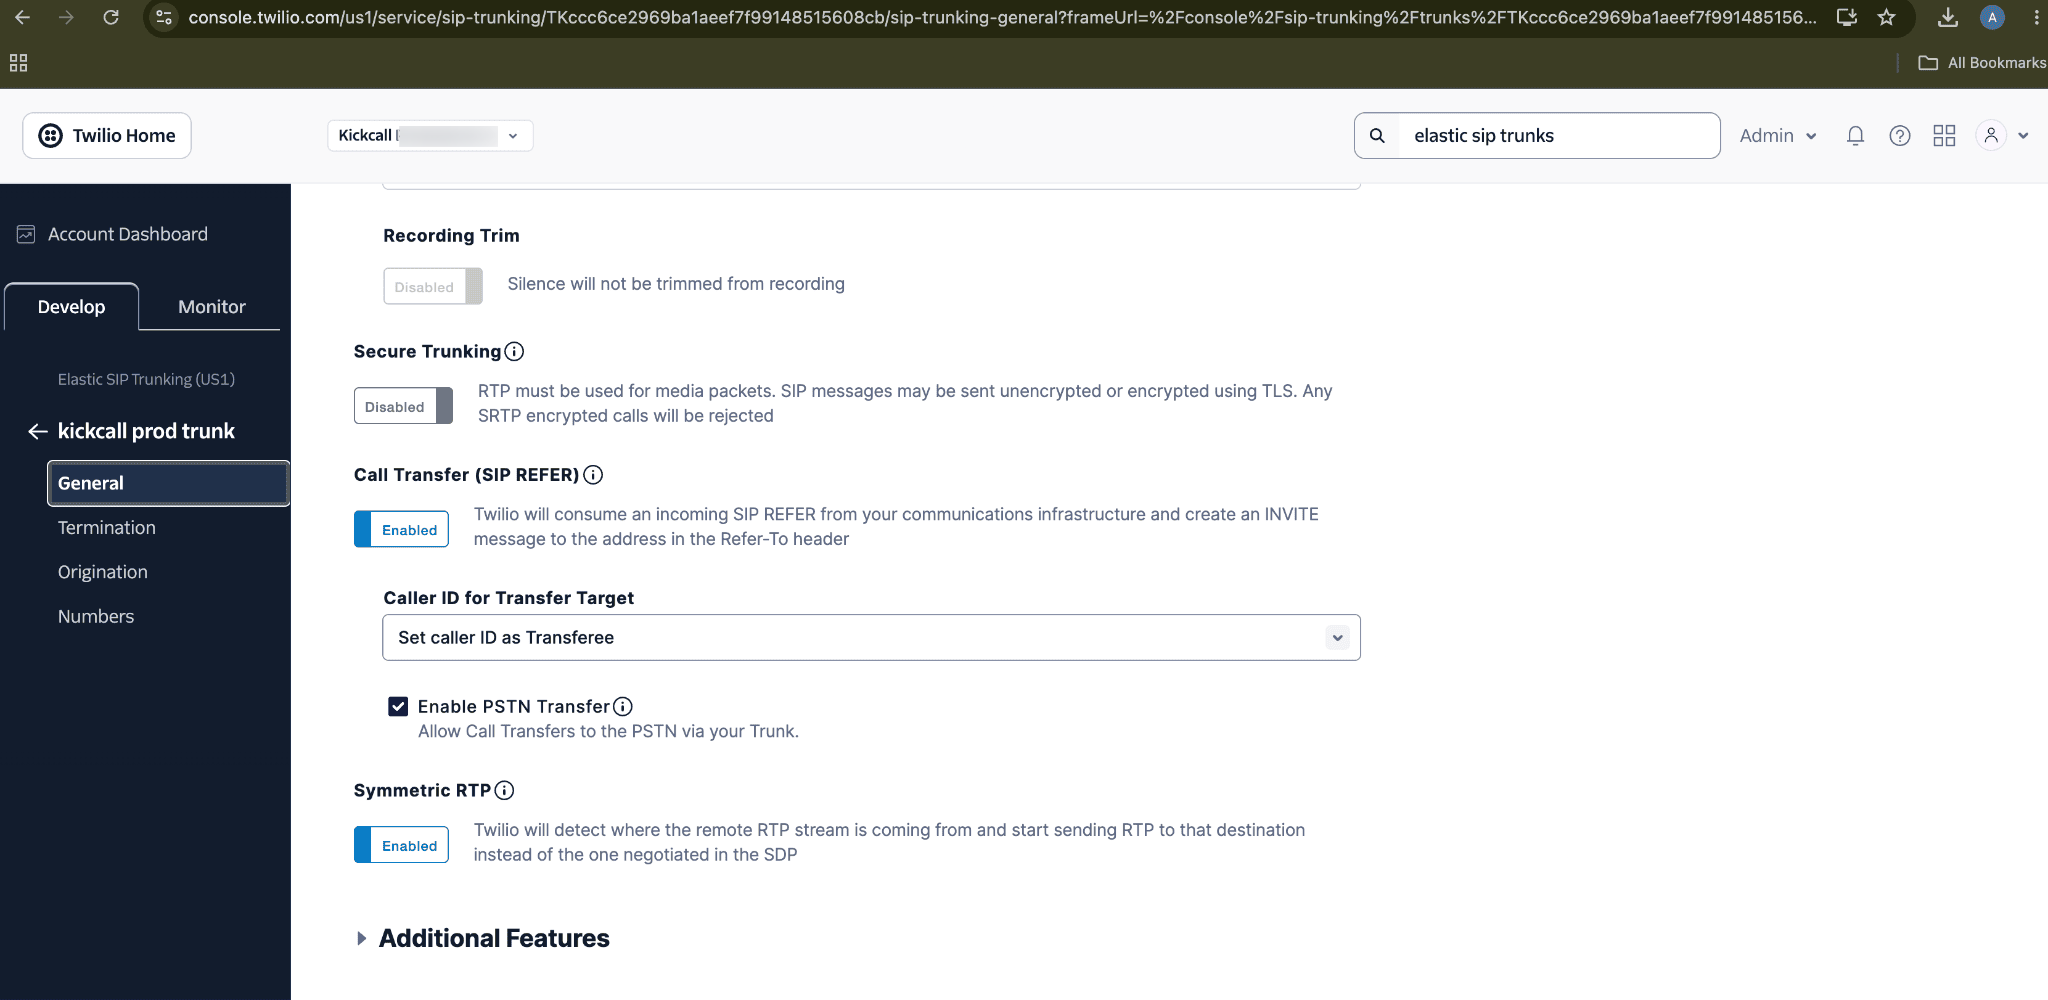
Twilio's General settings tab includes a few advanced options — Secure Trunking (TLS-encrypted signaling), Call Transfer (SIP REFER), and Symmetric RTP. These are safe to leave at their defaults unless your organization has specific security or compliance requirements.
Troubleshooting
Inbound calls aren't reaching your agent. Double-check the Origination URI in Twilio exactly matches the SIP address Kickcall generated, with no extra spaces.
Outbound calls aren't going through. Confirm the Termination SIP URI in Kickcall's Outbound Configuration matches Twilio exactly, and that your IP Access Control List or Credential List is set up and saved on the Twilio side.
Number connects but nothing happens. Make sure the trunk is assigned under the number's Configure tab in Twilio — this step is easy to miss.